When working on the earlier blog post on serial communication with automatic data collection and plotting, I thought that maybe it would be nice to try to plot some audio waveforms as well. Now, to do that we need an audio source and I went for using a QAudioInput for that.
So, the plan for this post is to set up the following:
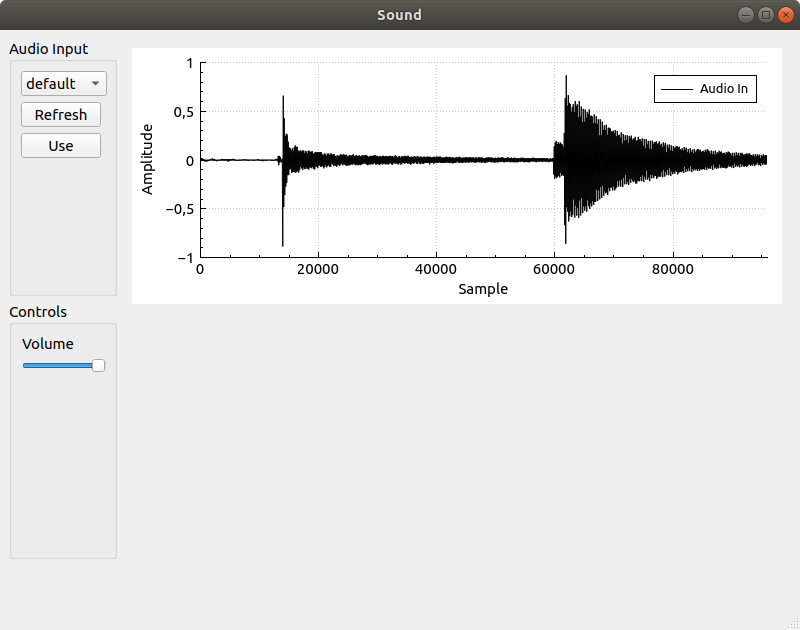
The GUI I made looks like below and is as usual created in the GUI Designer part of Qt Creator.
It takes some wrestling with this GUI Designer to get a hang of it and I am not quite proficient yet (far from). The only recommendation I can give about that tool is to play with it and see what happens.
The GUI consists of a left hand side with a QComboBox for selection of audio device and a volume slider, a QSlider. On the right hand side there is a QCustomPlot as earlier created by inserting a QWidget and then promoting in to a QCustomPlot.
The Use button activates the input device and starts the sampling and the Refresh button runs the scan for audio devices again and repopulates the QComboBox.
The idea is to have the QAudioInput device generating samples into a QBuffer. Regularly, after sampling for 100ms (or some other time interval we select) we are notified that there is sample data to process in the buffer. When this notification comes, we will convert the new sample data to a format that can be plotted on the QCustomPlot.
The QCustomPlot will have a 2 seconds (or 96000 samples at 48KHz sampling rate) sliding window of data that it displays as a waveform.
First of all, since we are using QCustomPlot we are going to need printsupport and since we are also going to use sound devices we need to also add multimedia to the list of Qt modules used in the project. This can be found in the project's .pro file.
QT += core gui printsupport multimediaThis program does not contain a whole lot of code and all of it is implemented in mainwindow.h and mainwindow.cpp. We will start by looking at mainwindow.h to get a bit of an overview of what is involved.
First off, there are a few includes that we need for audio input, buffers and plotting.
#include <QtMultimedia/QAudioInput>
#include <QBuffer>
#include "qcustomplot.h"
The QBuffer class gives you QIODevice Interface to an array of storage. Another class that is also (in a number of steps) derived from QIODevice is QFile, so working with a QBuffer will have some similarities to working with a file.
The second interesting thing in mainwindow.h is the set of slots.
private slots:
    void on_refreshInputPushButton_clicked();
    void on_useInputPushButton_clicked();

    void processAudioIn();
    void stateChangeAudioIn(QAudio::State s);
    void on_volumeHorizontalSlider_sliderMoved(int position);
Three of these slots, the ones starting with "on_" are related to the interactions with the buttons and slider in the GUI. The processAudioIn slot will be connected to a notification signal from the QAudioDevice so that it is called each time there is a certain amount of sample data available. The stateChangeAudioIn will be connected to track status changes to the audio device.
There is also a private function void samplesUpdated();, that will be called from processAudioIn and it will take care of updating the plot.
The state used in this program is next.
private:
    QAudioInput *mAudioIn = nullptr;
    QBuffer  mInputBuffer;

    QVector<double> mSamples;
    QVector<double> mIndices;
mAudioIn will be our handle on the input device and mInputBuffer is the buffer that will receive samples from the audio device.
mSamples and mIndices will hold the 2 second sliding window of samples that the plot is displaying. In this case we are using the QVector<double> mode of data storage as opposed to a QSharedPointer to QCPGraphDataContainer approach used in the post about serial communication. As I want to add data over time to this data-set and also remove some of the old data, I thought that it would be easier with a QVector.
Below, you find the full code listing of mainwindow.h.
#ifndef MAINWINDOW_H
#define MAINWINDOW_H

#include <QMainWindow>
#include <QtMultimedia/QAudioInput>
#include <QBuffer>
#include "qcustomplot.h"

QT_BEGIN_NAMESPACE
namespace Ui { class MainWindow; }
QT_END_NAMESPACE

class MainWindow : public QMainWindow
{
    Q_OBJECT

public:
    MainWindow(QWidget *parent = nullptr);
    ~MainWindow();

private slots:
    void on_refreshInputPushButton_clicked();
    void on_useInputPushButton_clicked();

    void processAudioIn();
    void stateChangeAudioIn(QAudio::State s);
    void on_volumeHorizontalSlider_sliderMoved(int position);

private:
    Ui::MainWindow *ui;

    void samplesUpdated();

    QAudioInput *mAudioIn = nullptr;
    QBuffer  mInputBuffer;

    QVector<double> mSamples;
    QVector<double> mIndices;

};
#endif // MAINWINDOW_H
Now we can jump into mainwindow.cpp and break that file down. We can start with the constructor of the MainWindow object and look at the things are initialized in there.
MainWindow::MainWindow(QWidget *parent)
    : QMainWindow(parent)
    , ui(new Ui::MainWindow)
{
    ui->setupUi(this);
    this->setWindowTitle("Sound");


    QList<QAudioDeviceInfo> inputDevices =
            QAudioDeviceInfo::availableDevices(QAudio::AudioInput);

    for (QAudioDeviceInfo d : inputDevices) {
        ui->inputDeviceComboBox->addItem(d.deviceName(),QVariant::fromValue(d));
    }

    /* Setup plot */
    ui->plot->setInteractions(QCP::iRangeDrag | QCP::iRangeZoom);
    ui->plot->legend->setVisible(true);
    QFont legendFont = font();
    legendFont.setPointSize(10);
    ui->plot->legend->setFont(legendFont);
    ui->plot->legend->setSelectedFont(legendFont);
    ui->plot->legend->setSelectableParts(QCPLegend::spItems);
    ui->plot->yAxis->setLabel("Amplitude");
    ui->plot->xAxis->setLabel("Sample");
    ui->plot->yAxis->setRange(-1.0, 1.0);
    ui->plot->clearGraphs();
    ui->plot->addGraph();

    ui->plot->graph()->setPen(QPen(Qt::black));
    ui->plot->graph()->setName("Audio In");

    for (int i = 0; i < 96000; i ++) {
        mIndices.append((double)i);
        mSamples.append(0);
    }

}
A list of QAudioDeviceInfo objects is created by asking for the availableDevices. The devices we are interested in are AudioInput devices.
    QList<QAudioDeviceInfo> inputDevices =
            QAudioDeviceInfo::availableDevices(QAudio::AudioInput);
The devices in the list are then added to the QComboBox where the user can select which input device to use.
    for (QAudioDeviceInfo d : inputDevices) {
        ui->inputDeviceComboBox->addItem(d.deviceName(),QVariant::fromValue(d));
    }
The additional data stored in the QComboBox is the actual QAudioDeviceInfo object. So the QComboBox essentially implements a mapping from device names to their device info object. The QAudioDeviceInfo object is turned into a QVariant at this point.
Then the plotting parameters are configured. This is done very similarly to how it was done in the earlier text.
    /* Setup plot */
    ui->plot->setInteractions(QCP::iRangeDrag | QCP::iRangeZoom);
    ui->plot->legend->setVisible(true);
    QFont legendFont = font();
    legendFont.setPointSize(10);
    ui->plot->legend->setFont(legendFont);
    ui->plot->legend->setSelectedFont(legendFont);
    ui->plot->legend->setSelectableParts(QCPLegend::spItems);
    ui->plot->yAxis->setLabel("Amplitude");
    ui->plot->xAxis->setLabel("Sample");
    ui->plot->yAxis->setRange(-1.0, 1.0);
    ui->plot->clearGraphs();
    ui->plot->addGraph();

    ui->plot->graph()->setPen(QPen(Qt::black));
    ui->plot->graph()->setName("Audio In");
One difference is that the yAxis range is set to (-1.0, 1.0) and that the data-set is now called "Audio In".
The storage for the waveform is then initialized. There will be 96000 indices and samples as we will have a 2 seconds sliding windows at 48KHz sampling rate.
    for (int i = 0; i < 96000; i ++) {
        mIndices.append((double)i);
        mSamples.append(0);
    }
That is what is important in the constructor. Now we can look at the rest of the methods defined.
The code below is run when the Refresh button is clicked. This simply goes through the process of asking for available devices again and updates the contents of the QComboBox.
void MainWindow::on_refreshInputPushButton_clicked()
{
    QList<QAudioDeviceInfo> inputDevices =
            QAudioDeviceInfo::availableDevices(QAudio::AudioInput);

    ui->inputDeviceComboBox->clear();
    for (QAudioDeviceInfo d : inputDevices) {
        ui->inputDeviceComboBox->addItem(d.deviceName(),QVariant::fromValue(d));
    }
}
The next thing to look at is what happens when the Use button is clicked. A lot of stuff is going on here so this can take some breaking down.
void MainWindow::on_useInputPushButton_clicked()
{
    QVariant v = ui->inputDeviceComboBox->currentData();
    QAudioDeviceInfo dev = v.value<QAudioDeviceInfo>();

    QAudioFormat format;
    format.setSampleRate(48000);
    format.setChannelCount(1);
    format.setSampleType(QAudioFormat::SignedInt);
    format.setCodec("raw");
    format.setSampleSize(16);

    if (mAudioIn) delete mAudioIn;
    mAudioIn = nullptr;

    mAudioIn = new QAudioInput(dev,format);
    mAudioIn->setVolume(0.1);
    mAudioIn->setNotifyInterval(100);


    connect(mAudioIn, &QAudioInput::notify,
            this, &MainWindow::processAudioIn);
    connect(mAudioIn, &QAudioInput::stateChanged,
            this, &MainWindow::stateChangeAudioIn);

    mInputBuffer.open(QBuffer::ReadWrite);
    mAudioIn->start(&mInputBuffer);
}
First we look up in the QComboBox which device is selected.
    QVariant v = ui->inputDeviceComboBox->currentData();
    QAudioDeviceInfo dev = v.value<QAudioDeviceInfo>();
Then a sample format is specified.
    QAudioFormat format;
    format.setSampleRate(48000);
    format.setChannelCount(1);
    format.setSampleType(QAudioFormat::SignedInt);
    format.setCodec("raw");
    format.setSampleSize(16);
The parameters above seem to work well with my Blue Snowball microphone under Linux. The parameters are hard coded here but could of course have been exposed to the user via the GUI.
Next check if the audio input device has already been created (by a previous click on the button) and in that case remove that device.
    if (mAudioIn) delete mAudioIn;
    mAudioIn = nullptr;
Then we can set up a new input device.
    mAudioIn = new QAudioInput(dev,format);
    mAudioIn->setVolume(0.1);
    mAudioIn->setNotifyInterval(100);
Here we make use of the sample format specified earlier. The volume of the device is initially set to a low value. Volume is a value between 0 and 1. A notification interval is set to 100ms and this means that a notify signal will be triggered every 100ms.
There are two signals from the audio device that we will connect.
    connect(mAudioIn, &QAudioInput::notify,
            this, &MainWindow::processAudioIn);
    connect(mAudioIn, &QAudioInput::stateChanged,
            this, &MainWindow::stateChangeAudioIn);
The first of these are the notify signal as mentioned above. notify is here connected to processAudioIn. The stateChanged signal is connected to slot stateChangeAudioIn. Currently the program is not doing any real work in relation to this signal, it just prints a message.
Lastly the QBuffer is opened for reading and writing and the audio device is started.
    mInputBuffer.open(QBuffer::ReadWrite);
    mAudioIn->start(&mInputBuffer);
Once the device is started it will start producing samples.
When enough samples have been written (100ms worth of samples), the notify signal goes off and processAudioIn is executed.
void MainWindow::processAudioIn()
{
    mInputBuffer.seek(0);
    QByteArray ba = mInputBuffer.readAll();

    int num_samples = ba.length() / 2;
    int b_pos = 0;
    for (int i = 0; i < num_samples; i ++) {
        int16_t s;
        s = ba.at(b_pos++);
        s |= ba.at(b_pos++) << 8;
        if (s != 0) {
            mSamples.append((double)s / 32768.0);
        } else {
            mSamples.append(0);
        }
    }
    mInputBuffer.buffer().clear();
    mInputBuffer.seek(0);

    samplesUpdated();
}
We now want to read out all data from the QBuffer and populate the mSamples vector with values. The data read from the QBuffer are raw bytes, but we have specified 16 bit samples so to create one value for mSamples two values from the QBuffer will be used. these are combined into one 16 bit value and then converted into a double between 0 and 1.
When that is done the QBuffer is cleared.
The calls to seek(0) rewinds the "position"-marker associated with the QBuffer. The position-marker is the place at where reading or writing to the buffer takes place.
Control is then passed over to the samplesUpdated function that handles the sliding window of samples used to display the waveform.
void MainWindow::samplesUpdated()
{
    int n = mSamples.length();
    if (n > 96000) mSamples = mSamples.mid(n - 96000,-1);

    ui->plot->graph(0)->setData(mIndices,mSamples);
    ui->plot->xAxis->rescale();
    ui->plot->replot();
}
If there are more than 96000 samples in mSamples enough samples are removed from the beginning of the vector so that there are only 96000 left. Older data is towards the front of this vector. The mid method on QVector takes two arguments, a starting index and a final index. The elements of the QVector that are outside of this range (from start to end) is removed. Using -1 as the end index means "to the end". So we are asking to to keep all elements from index n - 96000 to the end of the QVector.
The samples are then handed over to QCustomPlot for display.
Now there are only two things left to mention and that is the volume slider and the state change slot. These are not very tricky.
void MainWindow::stateChangeAudioIn(QAudio::State s)
{
    qDebug() << "State change: " << s;
}

void MainWindow::on_volumeHorizontalSlider_sliderMoved(int position)
{
    if (mAudioIn) {
        mAudioIn->setVolume((double)position/1000.0);
    }
}
When there is a state change in the audio device a debug message is printed. In a more complex setup, I am sure we could come up with more useful ways to handle the knowledge that the state changed and in what way it changed.
The slider has been set up to provide values between 0 and 1000 as it slides from left to right. The rightmost position means maximum value and should correspond to a value of 1.0 being used in the setVolume call.
And now the complete mainwindow.cpp follows.
#include "mainwindow.h"
#include "ui_mainwindow.h"
#include <QDebug>

MainWindow::MainWindow(QWidget *parent)
    : QMainWindow(parent)
    , ui(new Ui::MainWindow)
{
    ui->setupUi(this);
    this->setWindowTitle("Sound");


    QList<QAudioDeviceInfo> inputDevices =
            QAudioDeviceInfo::availableDevices(QAudio::AudioInput);

    for (QAudioDeviceInfo d : inputDevices) {
        ui->inputDeviceComboBox->addItem(d.deviceName(),QVariant::fromValue(d));
    }

    /* Setup plot */
    ui->plot->setInteractions(QCP::iRangeDrag | QCP::iRangeZoom);
    ui->plot->legend->setVisible(true);
    QFont legendFont = font();
    legendFont.setPointSize(10);
    ui->plot->legend->setFont(legendFont);
    ui->plot->legend->setSelectedFont(legendFont);
    ui->plot->legend->setSelectableParts(QCPLegend::spItems);
    ui->plot->yAxis->setLabel("Amplitude");
    ui->plot->xAxis->setLabel("Sample");
    ui->plot->yAxis->setRange(-1.0, 1.0);
    ui->plot->clearGraphs();
    ui->plot->addGraph();

    ui->plot->graph()->setPen(QPen(Qt::black));
    ui->plot->graph()->setName("Audio In");

    for (int i = 0; i < 96000; i ++) {
        mIndices.append((double)i);
        mSamples.append(0);
    }

}

MainWindow::~MainWindow()
{
    delete ui;
}


void MainWindow::on_refreshInputPushButton_clicked()
{
    QList<QAudioDeviceInfo> inputDevices =
            QAudioDeviceInfo::availableDevices(QAudio::AudioInput);

    ui->inputDeviceComboBox->clear();
    for (QAudioDeviceInfo d : inputDevices) {
        ui->inputDeviceComboBox->addItem(d.deviceName(),QVariant::fromValue(d));
    }
}

void MainWindow::on_useInputPushButton_clicked()
{
    QVariant v = ui->inputDeviceComboBox->currentData();
    QAudioDeviceInfo dev = v.value<QAudioDeviceInfo>();

    QAudioFormat format;
    format.setSampleRate(48000);
    format.setChannelCount(1);
    format.setSampleType(QAudioFormat::SignedInt);
    format.setCodec("raw");
    format.setSampleSize(16);

    if (mAudioIn) delete mAudioIn;
    mAudioIn = nullptr;

    mAudioIn = new QAudioInput(dev,format);
    mAudioIn->setVolume(0.1);
    mAudioIn->setNotifyInterval(100);


    connect(mAudioIn, &QAudioInput::notify,
            this, &MainWindow::processAudioIn);
    connect(mAudioIn, &QAudioInput::stateChanged,
            this, &MainWindow::stateChangeAudioIn);

    mInputBuffer.open(QBuffer::ReadWrite);
    mAudioIn->start(&mInputBuffer);
}

void MainWindow::processAudioIn()
{
    mInputBuffer.seek(0);
    QByteArray ba = mInputBuffer.readAll();

    int num_samples = ba.length() / 2;
    int b_pos = 0;
    for (int i = 0; i < num_samples; i ++) {
        int16_t s;
        s = ba.at(b_pos++);
        s |= ba.at(b_pos++) << 8;
        if (s != 0) {
            mSamples.append((double)s / 32768.0);
        } else {
            mSamples.append(0);
        }
    }
    mInputBuffer.buffer().clear();
    mInputBuffer.seek(0);

    samplesUpdated();
}

void MainWindow::stateChangeAudioIn(QAudio::State s)
{
    qDebug() << "State change: " << s;
}

void MainWindow::on_volumeHorizontalSlider_sliderMoved(int position)
{
    if (mAudioIn) {
        mAudioIn->setVolume((double)position/1000.0);
    }
}

void MainWindow::samplesUpdated()
{
    int n = mSamples.length();
    if (n > 96000) mSamples = mSamples.mid(n - 96000,-1);

    ui->plot->graph(0)->setData(mIndices,mSamples);
    ui->plot->xAxis->rescale();
    ui->plot->replot();
}Ok, that was a small program for audio input. Maybe it can be useful for someone as a base of something fun.
Thanks for reading, I hope you enjoyed it. I would be grateful for any and all feedback you may have. I am not a Qt expert at all and may be doing things here that are very not-the-Qt-way. If that is the case, please let me know.
Please contact me with questions, suggestions or feedback at blog (dot) joel (dot) svensson (at) gmail (dot) com or join the google group .
© Copyright 2020 Bo Joel Svensson
This page was generated using Pandoc.